Friday, 27 January 2012

The how to's of our Christmas gifts!

Well, now that Frogs and Snails has enlightened you all to our children's Christmas gifts and our little plan to encourage their sense of giving rather than receiving I thought I'd give you a run down on how I made some of their handmade gifts.  

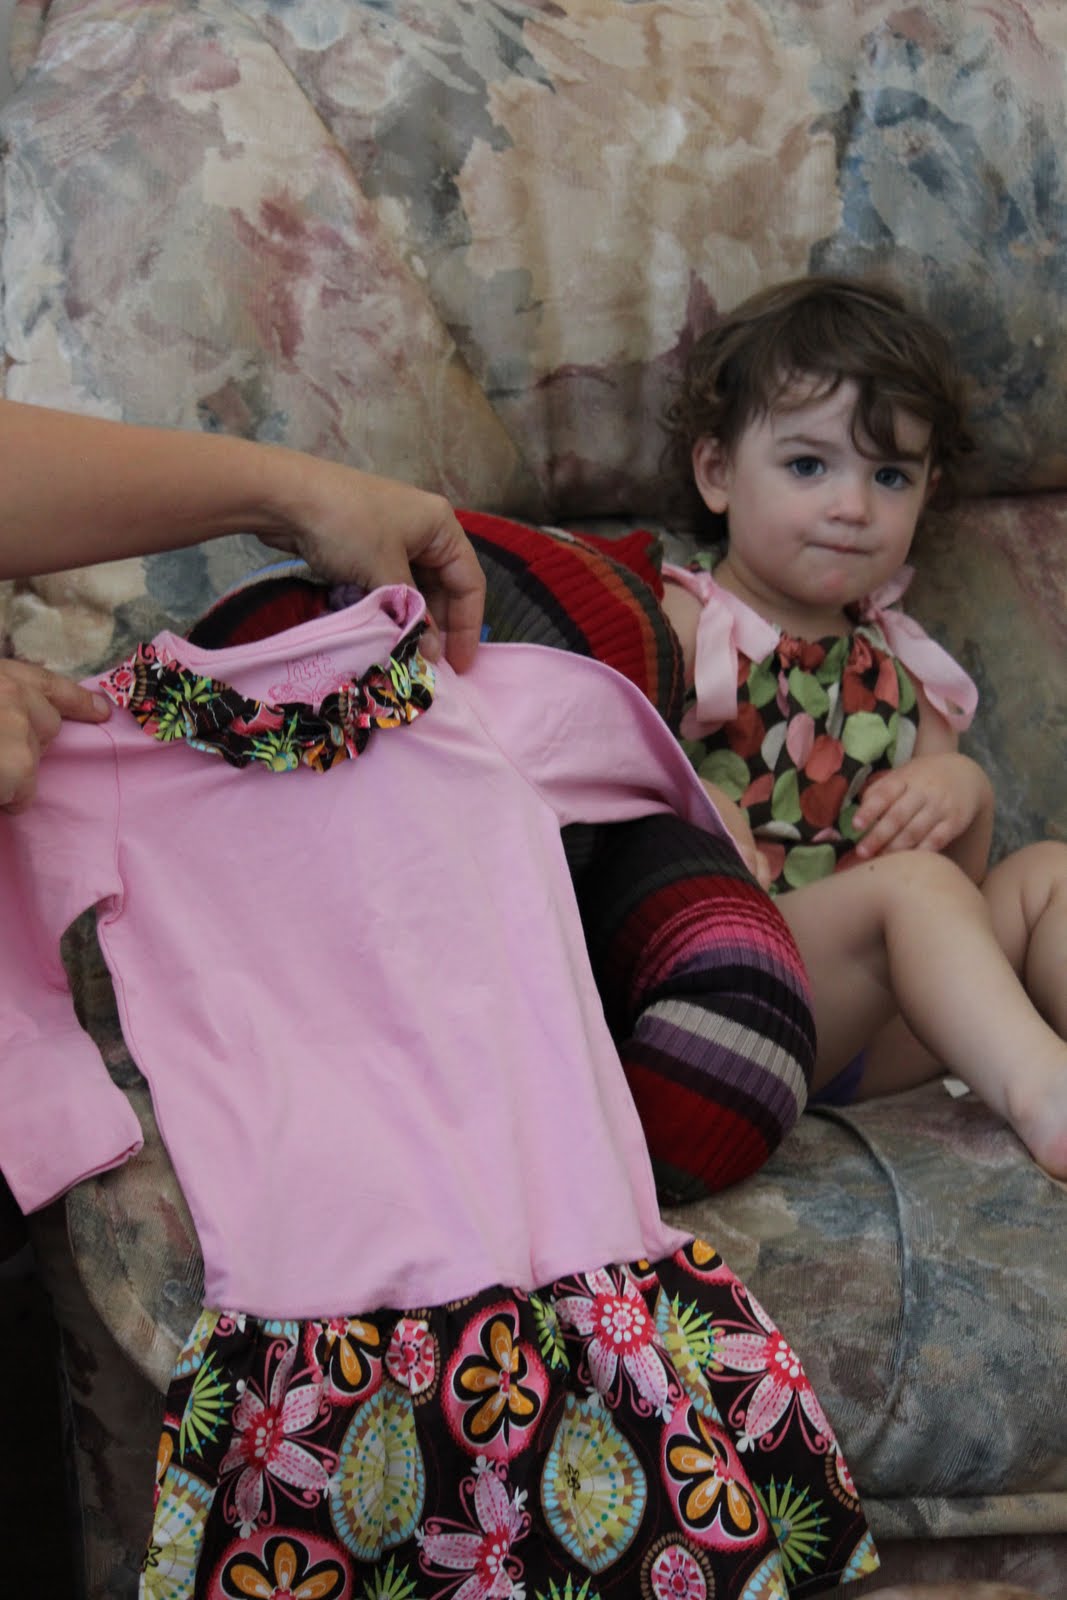
First off, let's get the girly dress out of the way.  This was the easy one.  A plain pink long sleeve top from Best and Less for $4 and a beautiful Fat Quarter I got off Etsy for $3.  So excluding my time this dress was made for the bargain price of $7.  All I did was hem two thirds of the fat quarter, stitch the sides together and then gather the top hem before sewing it to the shirt. 


Lastly,  I cut a strip from the remaining fabric, doubled it over and hemmed it before sewing a loose stitch straight down the middle.  I then carefully pulled the cotton so the material gathered and then sewed it on the neckline to make a lovely ruffle.  Easy peasy!  


I was rather pleased with the end result.  What do you think?  It looks even better on and although a little big on our petite Miss Two it is a dress she will most likely fit into for a few years to come.


Little Miss Two has a name beginning with E and although she is very little she has a tendency to be rather clumsy and heavy handed.  Despite her tiny frame she seems to bump into everything as if she were a huge elephant so we call her E... the Elephant.  I was looking through some blogs one day and came upon a photo of an elephant cushion which I thought was very clever.  I saved a copy of the picture but didn't think at the time to save a copy of the instructions so when the idea of hand made Christmas gifts came up and I wanted to make this cushion I had to come up with a method myself based on one photo.  

I took a trip to the local Salvation Army Store and found myself a $6 woollen jumper.  It was perfect, beautiful colours and oh so soft.  I couldn't wait to get to work on it.  I started by cutting off the neck and removing the sleeves.   I stitched the top together and then hand stitched on one side and gathered the cotton to create the ear.  I stuffed it with some cushion stuffing I had left over from another project (below) hand stitched again to create the other ear and finally sewed the bottom of the jumper together.  It looked more like a lolly in a wrapper at this point but I could see it's potential for being an elephant so I continued on.  Taking one of the sleeves I sewed one end together, filled it with stuffing and then sewed it to the lolly wrapper shaped cushion and TA-DA, my elephant had a trunk.  I added a couple of buttons as eyes and she was done.  


The stripes of the jumper were horizontal so you can see that it was made by turning the jumper on it's side.
I can't express enough how happy I was with the end product.  My elephant was so soft and comfy to lean against, I kept finding my boys cuddling up with it on the sofa and had to wrap it up ready for Christmas just to stop them from taking it.  

 Next up I moved onto matching travel mats for Little D and Little F.  I found this fantastic fabric from a Japanese supplier on Etsy.  Half a yard of this gem of a find delivered to my door from Japan for the bargain price of $8.  Another trip to the Salvo's produced two lovely, green, as new cushion covers for just $2 each.  So, doing the maths that makes two travel mats for only $5 each.  


I cut the fabric in half, retaining a small strip off the side for some ties and sewed in onto the cushion cover, tucking in the hemmed tie as I sewed over the final edge.  The beauty of using a cushion cover as a base meant it has in built storage. Master 8 rummaged through his collection of Matchbox cars to find a couple of cars to zip up into the cushions and the whole thing rolled up, sides folded in and secured with the ties would only take up a small amount of room in Mumma's bag when needing to keep the boys entertained whilst out.   Perfect!


Love it!  On the back I used some fabric markers to write each boys names so there would be no arguments over whose was whose.  

The last one I'll show you for today is Little F's fire engine.  This was the most time consuming gift of all.  Mostly because I started it before I bought my sewing machine so it was all hand stitched.  It started it's life as a red, square cushion, probably taking pride of place on somebodies sofa before being tossed into a Salvo's bin.  One man's trash is another man's treasure!  It was absolutely perfect for my little project at at only $3 for the cushion, 20 cents for a half a metre of yellow fabric (crazy, I know) and 50 cents for a metre of blue fabric with a few buttons I already had I created this!


Yes!  You read right!  One cuddly, soft fire engine for only $3.70 - say it with me.  BARGAIN!!!!

I love the SALVO's!!!!

I took the cushion and drew the basic shape on it, cut it out and then hand stitched it all together.  I stitched and stitched and stitched some more.  I then cut out the head lights and ladder, applied some heat and bond and then applique stitched around the edges (it's a kids toy, heat and bond alone just wouldn't cut it.)  I did the same for the light blue window.  The tyres were just a square of fabric with a bit a stuffing placed on top.  I gathered up the sides and shaped it in a sphere and secured to the engine with the button and a few stitches around the edges to ensure those blue tyres weren't going anywhere.  

Little F better look after his fire engine or my poor fingers will never forgive him.  Hours and hours of sewing this took but I think it was worth it. But in hindsight, I really should have invested in a thimble!


Tuesday, 24 January 2012

Handmade Gifts for Boys (and a Girl)

For Christmas last year my sisters and I agreed that the next generation was expanding a little too quickly for us to purchase Christmas presents for all the nephews and niece (yes there is a girl in there.) We've had three new additions in the last eighteen months alone (all male, of course). We also agreed that Christmas was getting a little too commercial for our liking, where the children were spending most of the day opening gifts and not really focusing on what they were receiving or who they were receiving it from. The solution we came up with was a type of Kris Kringle with a twist. We put all the kids names in a hat then each Aunty drew out as many names as she had children. The twist... we were going to make the gifts ourselves, with a $20 limit on supplies needed.
So, I, having two children with me for Christmas, would be making two gifts as would our younger sister who also has two children (one of which is the rarest of the rare in our family... a daughter). Our youngest sister having no children got off scot free. Lucky Sonshine and Lollypops, having four kids would have to provide four presents (that's what you get for your dedication to expanding the male population.)

We started preparing way back in October. I started keeping an eye out for supplies in early November but I must say I was still frantically working away at my sewing machine two days before Christmas.

On the day we handed out the presents to each child in ascending age order. We all watched as each child opened their very own, handmade gift before moving on to the next recipient.


Master 7 months received a beautiful handmade animal picture book with each of his and his cousin's animal motifs in it.


Master 15 months (Little F) received a fire engine cushion(one of his many nick names is Little F the Fire Engine.) He also recieved a car track roll (not pictured) because as if Sonshine didn't have her work cut out for her making gifts for FOUR nephews and niece (yes, still only one), she had to make them TWO EACH! I don't know how she does it.


Master 15 months received an 'op-shopped' playdough kit with homemade playdough. Little D and I really enjoyed making this together and I loved the utensils we chose so much that I want to make another for our house. Garlic presses, potato mashers and playdough were made for each other.


Young Miss 2 and a bit received a lovely cushion in the shape of an elephant (another nick name nod).It was made from an upcycled jumper found at the op-shop. I love the colours. She also recieved one of the beautiful dresses that Sonshine has been working on. On a side note, between you and me, I think our Sonshine was absolutely thrilled to have picked our only niece's name out of the Kris Kringle hat and with all those boys it is great that she does have one little girl in the mix to give her a little XX chromosome fix every now and then.


Master 2 and a half received the same car track roll as his brother which is a blessing for me. Having two boys with similar interests so close together in age means duplicates of everything is an absolute must in the Frogs and Snails household.
I love the photo on the right. Master 8 is showing Little D the car he personally chose for his track. It was so beautiful seeing his pride and joy in giving a gift to another.
Little D also received a handmade t'shirt (not pictured) made by Master 8 with an orange and red print on it. He calls it his sunset shirt.


Master 3 received a personalised alphabet book. I just love that cheeky face.


Master 5 received a letter writing kit in a handmade bag. This is the piece that I left until the very last minute but I was super pleased with the final result.


Master 8 received every 8 year old's dream, a huge bag of slimey slime! He also received some yummy homemade macaroons (his favourite gluten free treat)

The great thing about opening one handmade present each, one at a time is that even a month later, the kids still know where their gifts came from and who made some of their cousins gifts too. Another great thing (for my boys at least) is that these lovely individual gifts, made for them by people who know and love them, are shaping up to be some of their favourite possessions of 2012 and possibly of all time.

Friday, 23 December 2011

More little girl dresses from the woman with 4 boys!

Well, I thought I was so organised this year.  I'd done all my Christmas shopping before November and even bought everything I needed for the many handmade gifts I was giving.  I had a total of 10 handmade gifts I planned on making and having bought all the supplies I made a start back in October.   By the end of November I was half way done.  By mid December I was still only half way done.  Four days until Christmas and I still had four to do, three of which I hadn't even started.  Needless to say, I have had a few marathon nights at the sewing machine and I am exhausted!  

Surviving on four hours of sleep a night when you have four boys to deal with in the day, a house to clean and food to prepare for the 28 people coming for dinner on Christmas Eve makes for a rather grumpy Mamma!  But, I am happy to say I have finally finished.  YAY!!!!  This morning I started and finished my final gift and everything is now wrapped - All with one day to spare! 

I can't share eight of the gifts with you yet as I don't want to spoil the surprise for the recipients but I can show you the matching little dresses I did for a good friend's two gorgeous girls.  A pretty ruffle dress for her 5 year old and a pillowcase dress for her 8 month old.  I finished the ruffle dress at 1am this morning and, although incredibly tired, I found it hard to fall asleep as I was so excited by how it turned out.  

Here are the shot's I took in my sleepy haze at 1am.


And here are some more shot's on my helpful little models taken at the more respectable time of 1 pm. 


You can see that Master 15 months does not feel the same as Master 5 when it comes to modelling girls dresses but doesn't he look so cute!!!  (It's a little small on him as it is made for someone almost half his age but it goes to show the versatility of a pillowcase dress.  Once the dress is too short she can easily wear it as a tunic and then a top.  It should do her for quite a few years.)

In hind sight I do think I over-extended myself this year, perhaps I should have started in June instead or maybe just not have left so much to the last minute.  I am very happy with all my end results though and I do hope the little kiddies all love their gifts as much time and love has gone into them.  

I am looking forward to sharing the rest of the pressies with you all next week but for now it is back to cleaning the house after a much needed computer and cuppa break!  Merry Christmas to everyone, keep safe and enjoy this special time of year with your friends or family!  Best Wishes to All!!!


Wednesday, 14 December 2011

My first pillowcase dress!

This week Master 5 has been invited to the 5th birthday party of a little girl in his Kindy class.  Not relishing the idea of braving the shops with 4 boys in toe just a week out from Christmas and not having time to wait for an online delivery, I decided to raid my fabric stash and create the girl an original Son-Shine and Lollypops dress.  

I have only ever made one dress before and that was a few weeks ago (I will have to wait to share that one in a few weeks for reason's that can not yet be revealed).  So, with very little experience under my belt, I set out to make a dress that would not only fit a 5 year old but would look beautiful and reasonably professional.  Did I mention that I do not have any dress patterns?  Buying a pattern would require venturing out into the world with 4 boys, something I try to avoid where possible.  I thought about buying a pattern online that gets sent via PDF to your inbox but when I took the time to find a dress I liked I discovered an electronic world of sewing tutorials and they give you easy to follow instructions for free.  Yes, FREE!!! I love that word.  

In the end I settled on a pillowcase dress - it looked like the easiest one at the time.  Despite its name, it's not actually made out of a pillowcase, although you could if you really wanted to.  I asked Master 5 to stand up straight for me and measured him up to get a general idea of sizing and how long to make the dress and wear the armholes should begin and then I got to ironing hems and sewing, ironing hems and sewing.  This routine continued until I finally had a nice, rectangular, pillowcase shaped dress.  All that was left to do was cut two lengths of ribbon, thread them through the top of the dress and sew in place.  I have to admit that my favourite part was sealing the ends of the ribbon with a lighter (or in my case the gas stove top) to stop them from fraying.  What can I say!  I like to play with fire!

Finally, with the dress finished, all I had to do was to get Master 5 to model it for me.  I don't know whether to be worried or not but he had no objections to wearing a dress at all.  He even posed nicely for me and when I showed him the photo's he was rather put out that I had only taken photo's of the dress, cropping out his face.  So I had to take another photo of him showing his face!  


Awwwww!  My beautiful Princess Prince!


So what do you think of my first ever pillowcase dress?  Do you think it's an acceptable present for a 5 year old girl?  I hope she likes it because she ain't getting anything else from us.  


Wet and wild!

This week I took Master 3 out shopping with me to Spotlight.  Whilst I was looking through the piles of fabric I told him he could go and choose one of the toys they have for party loot bags.  Of all the toys he had to choose from he finally decided on a packet of balloons.  "Look Mummy, baby balloons" he said.  "They are water balloons, you fill them with water and have water fights" I responded.  His face lit up!  If there is something that my boys love the most, it is having water fights (generally in their best clothes without my permission).  Now, I don't like to encourage my boys to fight, even to play fight as someone inevitably gets hurt, but boys will be boys and I'd rather they fight with water than with their fists.  At least with water fights they are interacting with each other, they are outside getting fresh air and exercise and they are learning and having fun at the same time.

Today being the first day of the summer school holidays we painstakingly filled those 20 water balloons and they went to town.  It lasted less than 5 minutes and Master 3 came running inside resembling a drowned rat, dripping all over my floor, to tell me they wanted more.  Since I didn't have any more I told them they could spend another 5 minutes with the hose (something I very rarely allow due to the water shortage but the garden was looking a little wilted so I thought the extra watering wouldn't hurt).  I came out to take photos of the boys just to find Master 3 now completely naked due to his clothes being drenched (I later found his dripping clothes making a nice wet patch on my dining room carpet) and Master's 8 and 5 almost completely dry.  That soon changed when the garden hose came out. 

The noise was deafening yet also hysterical.  For a bunch of boys there was a lot of high pitched, girly screams attacking my ear drums.  There was laughing, there was crying (the cold water pounding on Master 3's bare bottom was a little too much for him to take - the sobbing was interspersed with shivers) but overall their water sensory play was well enjoyed and it was hard to get them to put that hose away and come inside to dry off.  

Even, with the hose no longer in use they continued running around the backyard naked until their bare, little bodies were shrivelled and prune like.  I lost my temper with them a few times (mostly due to them hosing me down whilst I had my camera in hand) but despite the wet clothes, carpets and floor boards, the look on their faces was definitely worth the mopping and extra load of washing.  

Look at that face!


 Master 3 with strategic use of the cropping function!


Master 5 was the loudest of them all and most prepared.  He put his swimming clothes on!


Master 8 just loving the power of the hose!  I think he actually sprayed himself more than his brothers.

Sitting back looking at the photo's now I get a sense of accomplishment in their afternoon activity that I missed at the time.  Whilst they played I was consumed with thoughts of the mess they would make and how their loud screams would affect the neighbours and I completely missed the excitement of it all.  So, this being just the start of the school break I will set myself a challenge to let go of my anxieties and these feelings of unnecessary agitation and will try to relax more, go with the flow and hopefully learn to live in the moment as my boys do and enjoy just being with them.  Then maybe, just maybe I will survive the next 6 weeks before school goes back!

Saturday, 10 December 2011

DIY Christmas Decorations

This year I made the decision to not put our Christmas tree up.  It was a hard decision!  I love my Christmas tree and have always enjoyed setting it up and decorating it but I just couldn't take one more year of vigilantly watching the children for a whole month and constantly screaming 'Stay away from the tree'and 'Don't pull on the decorations'.  

The last few years I have tried to find alternative places to put our tree.  One year we had it set up in our master bedroom.  This worked for the better part of the day as the kids would only be in there with us in the early morning and at bath time in the evening.  Unfortunately, it left the rest of the house looking rather Scrooge like and visitors would automatically assume that we didn't have a tree at all.  So the following year I decided to set it up in our lounge room.  We have a corner in there that can be contained by placing a coffee table on it's side (sort of in the form of a child safety gate) between the sofa and TV unit to stop the kids from getting past it and within reach of the tree.  Needless to say, an upturned coffee table in the middle of your lounge certainly does detract from the beauty of the decorated tree.  Not to mention that once the kids hit a certain age they can just climb over the table anyway!  

So this year I decided to forego our traditional tree and instead to do something a little different.  I was on a budget though, having spent enough on the tree we weren't going to use, I didn't want to be spending any more money on decorations that are only up for one month a year.  So I decided to make my own tree out of twigs and branches and place it on top of the TV cabinet where little fingers couldn't reach.  You may ask why I didn't just put our traditional Christmas tree on the TV cabinet and the answer is that it's just too tall and the ceiling gets in the way.

What to put it in was my first dilemma.  I searched my house for a bucket, urn, pot, vessel of any kind that was not only big enough but also heavy enough to hold some large branches without toppling over.  Whilst searching in my storage cupboard I came across a large vase that a good friend bought me for my birthday a few years back which would be perfect.  It is a duck egg blue that has an iridescent shine to it rather like mother of pearl.  The picture of it below really doesn't do it justice.  


 I love this vase, it is stunning, but the colours just never went in my house. So I decided to sand it down and spray paint it Ivory much to my Mother's horror. 
Mrs Negative said to me "You can't do that! It won't work".
So, just like any normal child I set out to prove my mother wrong and I succeeded beautifully.  (Love you Mum - I am sure you only say these things to push us to do our best!)


Next up to collect some branches, so I took the kids for a walk down to a local park that has a bit of bushland and sent them out to collect twigs whilst I sat on the park bench and shouted out to them "Yes, that's a good one"or "No, that's too small." Once we had a big enough pile I collected them up in a bundle and carried them home (I felt rather like the little pig building his house out of sticks) whilst Master 8 pushed
Master 1 on his Smart Trike and Master's 3 & 5 held on to either end of the bundle of sticks as I had no hands free.  I'm sure we looked a very curious sight as we walked home (and of course the park was down hill from our house so it was an uphill battle getting that bundle home).

Once home we assembled in the newly painted vase and added a few balls, icicles, birds, Swedish crowns and reindeer (from Ikea of course) with a string of lights draped across the vase and we had our tree!

 `
And here it is at night with the lights on.  


I was sitting back admiring my work when it occurred to me that it was not possible to place the presents under the tree this year ( a thought that had evaded me until after all the hard work) but I was actually not too bothered about it.  It meant the kids couldn't rummage through them ahead of time and nothing would get damaged requiring re-wrapping.

All happy with my DIY tree I decided to continue my DIY decorations through out the house starting with my front door.  I have never had Christmas wreaths up on our door ever but have always wanted them,.  My problem is that we have double front doors so we would need two wreaths and decent ones can be pricey enough for one let alone two.  I wanted them to be simple without looking home made so I got my thinking cap on and looked around the house for any items I had on hand that I could use.  I took an old cardboard box and cut two equal sized circles from them and then cut another circle in the middle.  Master 8 and I sat down with our roll of Ikea drawing paper and cut varying lengths of paper which we then looped and stapled.  Once we had enough we glued them on to the cardboard wreaths and added some red bows that I picked up for $3 at Red Dot.  Bargain!


Here's a close up.  What do you think?


Being that there is still 16 days left until Christmas I am thinking I can still get a few more DIY Christmas decorations up so watch this space!  And I hope you all enjoy making your own decorations as much as we did.  It is so much more enjoyable to sit back and admire the decorations knowing that we created them ourselves.  Merry Christmas!!!


Thursday, 24 November 2011

Letting Go

Well I have waited for over two months for my lovely sonshine sister to take her turn to post and I think maybe I might inspire her (guilt her into it) if I just jump in and do one myself. So here goes.

Sometimes I feel like I just get too caught up in directing my children in HOW to play and forcing my closed minded views upon their open little minds.

For instance, in my mind, tea bags are used for making tea and on the odd occasion they are used for making pretend tea by some imaginative little minds. Little D is often seen wandering over to the cuppa cabinet to grab a couple of jigglers, so when I saw him heading over that way the other morning, I thought nothing of it and turned my focus back to my morning cuppa and junk mail stash.

The next time I looked up I saw D working away at his train set and forgot all about his visit to the tea and coffee cupboard.


The next time I looked up I remembered.


At this point I really wanted to give him the usual "tea is for teacups" type of redirection then I thought, is it? Why couldn't he play with the teeny tiny ground up particles of tea leaves that he was spreading all over my floor? Was it because of the mess? We do own a vacuum cleaner so that problem had a solution. Was it because of the cost of replacing the tea bags? The cost of paint, glue and other craft materials is more so that was a non issue too.

I had to decide, do I, A - tell him to stop, B - join in or C - sit back and see where he goes with it. At this point after realising in my own head that it really is okay to let your two and a half year old spread tea leaves from one end of the house to the other, I really actually wanted to go with option B but the observer in me won over and I sat back to see what he'd do.

He played for well over an hour, focused and constructive, never asking for help or input, fully immersed in the world he was creating and I got to wondering if he would have been so self sufficient in his play had I butted in and started imposing my rules and limitations on him. My guess is probably not.


I finally jumped in for a go a couple of minutes before I wanted him to clean up and it was so much fun having something to fill the trucks with. I can really see how it helps his little imagination soar. When it was time to clean up, we tapped all the tea out of the engines and trucks and packed them away as usual, then it only took a few minutes to wiz over the carpet.

And I had the perfect little helper for that task.